OVERVIEW
A new project in Cloud Coach is created at the click of a button. Whether it’s created from scratch or from a template, the project can be customized with tasks, subtasks, dependencies, start dates, and resource assignments. Projects can be saved as a template to be re-used as needed.
When planning a new project, creating a project helps a team to plan for project work. During project execution, the project plan will create transparency to project status as well as which team member is responsible for each task. By creating tasks and sub tasks on a project, users are able to proceed with project work in efficient ways that enable project predictability. The project plan should account for and reduce the unknown elements (risks and issues) involved with a project increases the likelihood of project success.
Creating project templates can help with efficiency in a number of ways. First, creating from a template is much faster from start to save. Instead of typing in new project and task details such as start dates, durations, and dependencies those details will be brought over into the new project, saving the time of manual cell entry of those data points. Second, standardization of projects helps with repeatability; project team members will be able to repeat and refine the processes that lead to success. Third, project reports are simplified when a common language is used. By reporting on the data points that different levels within the organization need to see, from project team member, to client, to executive team member, project status is easier to identify and success is more easily determined.
PROJECT CREATION
To create a Project, click Projects tab → New Project

CREATE NEW
Required fields are marked with * and include: Project Name, Task Name, Desired Start Date, and Duration. Additional fields such as Project Description, Phase Name, Task Description, Type, Dependent On, Assigned Resources, and Sub Tasks are not required but can be beneficial for clarity and efficiency as the project ramps up.

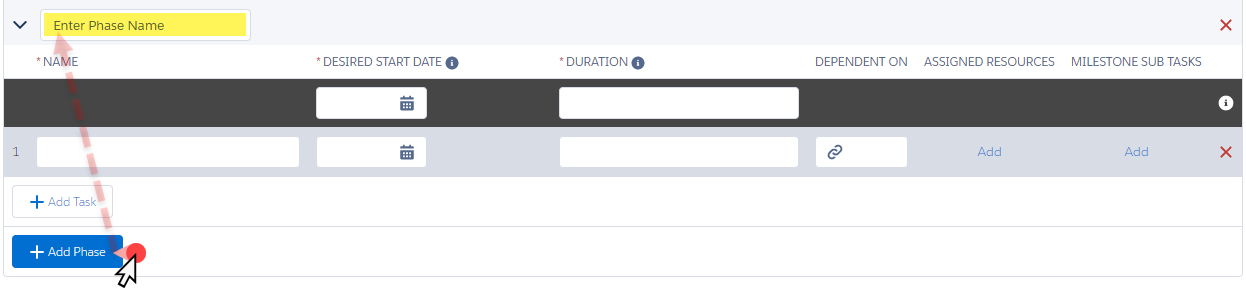
The Add Task button will add another line for a new task and all the fields to be created.
 The fields at the top of the task entry area with a dark gray header allow the project creator to select fields to populate in all tasks on the project. If the Desired Start Date is selected from the top field, it will be carried down to all tasks. Duration and Description also have this functionality in the header.
CREATE FROM TEMPLATE
Required fields are marked with * and include: (project) Name and Desired Start Date. The Project Description, Type, Task Name, Desired Start Date, Duration, Parent Task, Assigned Resources, and Sub Tasks will be brought from the template into the new project.

When edits to the project basics are complete, click Save or Save as Template. This automatically directs the user to the Project Gantt Page.
Next Steps:
Have questions? Attend our live forum! Register to attend
Read Article – Project Gantt View
Read Article – Cross Project Gantt View
![]()
Leave A Comment?